
Self_defined stipple pattern in Python(1)
(One class with two canvas)
www.chday169.url.tw
xbm file:
I have posted an issue of using vb. net predefined pattern in vb6(www.chday169.url.tw). Now I try to rewrite those to be used in Python.
Python is a wide and popular computer language, many people like to plot widget shapes with Python,
but it’s self predefined stipple pattern are so many as vb. Net( 56 types). Python canvas only offer”
err,gray25,gray50,gray75,hourglass,info,qutionhead,question,
warning” stipple pattern, but You can design and define your own bitmaps. Any file in .xbm (X bit map) format will work.
A file with the XBM (xbm)file extension is an X Bitmap Graphic file using the graphical user interface system called the X Window System to represent
monochrome(1 and 0,True or False) images with ASCII text, similar to PBM files. Some files in this format may instead use the .XBM (xbm) file extension.
In place of a standard bitmap name, use the pathname of the .xbm or .XBM something like “@D://xmbm//dog.xbm”. Python’s xbm file can be made in many ways.
The simple and easy way is to use some free software like “Junior Icon Editor(www.sibcode.com)” or “xbmeditor.py(developed by Mike Cavender) to draw the bitmap
and save as *.xbm file. You can also design a program to draw by yourself. Or you build a X10 or X11 bitmap image consists of a C fragment that define a width ,
height and data array containing the bitmap. To embed a bitmap in a Python program, you can put it inside a triple-quoted string:
BITMAPr = """
#define arrowr32_width 32
#define arrowr32_height 32
#define arrowr32_x_hot 0
#define arrowr32_y_hot 0
static const unsigned char arrowr32_bits[] = {
0x00,0x00,0x00,0x00,0x00,0x00,0x00,0x00,0x00,0x00,0x00,0x00,
0x00,0x00,0x00,0x00,0x7C,0x04,0x04,0x00,0x84,0x00,0x04,0x01,
0x84,0x00,0x04,0x03,0xFC,0xF4,0x7D,0x03,0xFC,0x14,0x4D,0x01,
0x84,0x14,0x45,0x01,0x84,0x14,0x45,0x01,0x84,0xE4,0x45,0x02,
0x00,0x00,0x01,0x00,0x00,0xF0,0x00,0x00,0x00,0x00,0x00,0x02,
0x00,0x00,0x00,0x06,0xFC,0xFF,0xFF,0x0F,0xFC,0xFF,0xFF,0x1F,
0x0C,0x00,0x00,0x30,0x0C,0x00,0x00,0x60,0x0C,0x00,0x00,0x60,
0x0C,0x00,0x00,0x30,0x0C,0x00,0x00,0x30,0xFC,0xFF,0xFF,0x1F,
0xFC,0xFF,0xFF,0x0F,0x00,0x00,0x00,0x0E,0x00,0x00,0x00,0x06,
0x00,0x00,0x00,0x06,0x00,0x00,0x00,0x02,0x00,0x00,0x00,0x00,
0x00,0x00,0x00,0x00,0x00,0x00,0x00,0x00};
"""
bitmapr = tk.BitmapImage(
data=BITMAPr,
foreground="white", background="black"
)
def right_():
right_1pix()
btnRight=tk.Button(window,bg='light blue',width=62,command=right_,image=bitmapr)
To create X11bitmaps, u can use The X11 bitmap editor, or drawing your image and then convert it to bitmap or xbm.
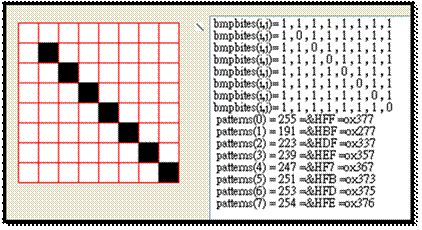
For example , if you want to build a xbm file shown as below.
If we use “1” to represent the blank (white color) and “0” for solid (black color). Since the first row is blank,
it means all grids in first row are fill with blank, i.e (1,1,1,1,1,1,1,1)
Since (1*2^7+ 1*2^6+ 1*2^5+1*2^4+ 1*2^3+ 1*2^2+1*2^1+ 1*2^0)=255,then Pattern(0)=255.
If we declare Pattern(0 to 7) as Byte ,then the bitmap data will look like
Pattern(0)=255 or Pattern(0)=&HFF or Pattern(0)=ox377
Pattern(1)=191 or Pattern(1)=&HBF or Pattern(1)=ox277
Pattern(2)=223 or Pattern(2)=&HFF or Pattern(2)=ox337
Pattern(3)=239 or Pattern(3)=&HBF or Pattern(3)=ox357
Pattern(4)=247 or Pattern(4)=&HFF or Pattern(4)=ox367
Pattern(5)=251 or Pattern(5)=&HBF or Pattern(5)=ox373
Pattern(6)=253 or Pattern(6)=&HFF or Pattern(6)=ox375
Pattern(7)=254 or Pattern(7)=&HBF or Pattern(7)=ox276
If we declare Pattern(0 to 7) as String ,then the bitmap data will look like
Pattern(0)=”1,1,1,1,1,1,1,1”
Pattern(1)=”1,0,1,1,1,1,1,1”
.
.
Pattern(7)=”1,1,1,1,1,1,1,0”
In python, We can use hex() or oct() function convert integer to hex string. For instance
hex(255)->’0xff’,hex(0)->’0x0’………
oxt(255)->’0o377’,oct(0) >’0o0’ ………
So the X11 xbm file will Look like:
#define test_width 8
#define test_height 8
static unsigned char cross_bits[] = {
0xff,0xbf,0xdf,0xef,0xf7,0xfb,0xfd,0xfe};
Now we use notepad ,notedpad++ or pyzo.exe to open the xbm file, it will be look like as following.
#define testB_width 8
#define testB_height 8
static unsigned char cross_bits[] = {
0x0,0x2,0x4,0x8,0x10,0x20,0x40,0x80};
The following graph are plotted by vb 6,the third one are plotted by python.

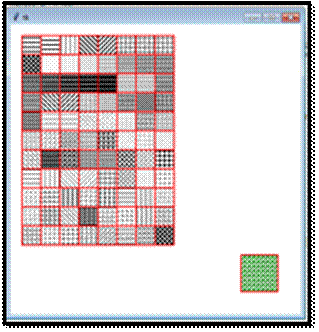
(b)Vb net predefined pattern:
The hatch brush pattern of vb net are list as:
def hatch():
brush=['0_Horizontal','1_HorizontalB','2_Vertical','3_ForwardDiagonal','4_BackwardDiagonal','5_LargeGrid','6_LargeGrid','7_LargeGrid','8_DiagonalCross',
'9_Percent05','10_Percent10','11_Percent20','12_Percent25','13_Percent30','14_Percent40','15_Percent50','16_Percent60','17_Percent70','18_Percent75',
'19_Percent80','20_Percent90','21_LightDownwardDiagonal','22_LightUpwardDiagonal','23_DarkDownwardDiagonal','24_DarkUpwardDiagonal','25_WideDownwardDiagonal',
'26_WideUpwardDiagonal','27_LightVertical','28_LightHorizontal','29_NarrowVertical','30_NarrowHorizonta','31_DarkVertical','32_DarkHorizontal','33_DashedDownwardDiagonal',
34_DashedUpwardDiagonal','35_DashedHorizontal','36_DashedVertical','37_SmallConfetti','38_LargeConfetti','39_ZigZag','40_Wave','41_DiagonalBrick','42_HorizontalBrick',
'43_Weave','44_Plaid','45_Divot','46_DottedGrid','47_DottedDiamond','48_Shingle','49_Trellis','50_Sphere','51_SmallGrid','52_SmallCheckerBoard','53_LargeCheckerBoard',
'54_OutlinedDiamond','55_SolidDiamond','56_Hline','57_Vline','58_NEdiagonal','59_NWdiagonal','60_grids','61_cross','62_dotpoints','63_emptydots','64_sand','65_capitalA',
'66_capitalB','67_capitalC','68_capitalD','69_dashsolidHline','70_dashsolidVline','71_NEdiagonal','72_NWdiagonal','73_halfsolidemptycircle','74_smllL','75_heavygrilles',
'76_bigLa','77_bigLb','78_smallS','79_trianglea','80_triangleb','81_smallX','82_smallplus',
'83_mutiplcircles','84_mouse','85_smallellipse','86_smallheart','87_mutiplheavyoval']
Type 56 to type 87 are defined by author.
Please note that the data storage used in my program (vb.net) is row by row, which is different from the column-by-column storage of other programs,
so the graphic editing or display (Junior Icon Editor orxbmEditor,or XBMeditor0419(author’s program)) should be rotated 90 degrees.
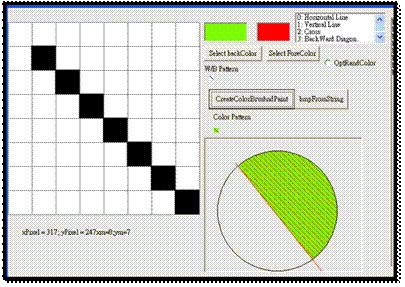
We can use two canvases and two mouse events within one Python class (same as vb ‘s two forms) to implement the drawing project.
One for drawing widgets ,and one for self_defined xbm.
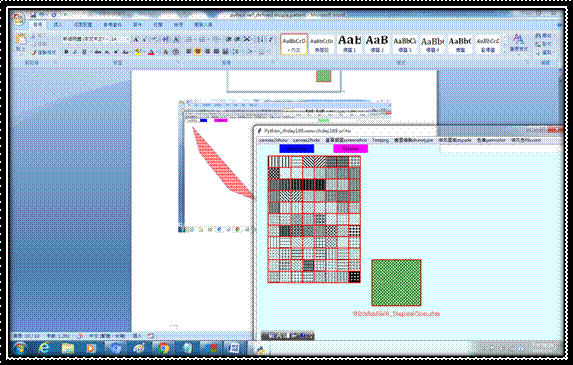
def canvasPatternShow_():
self.command='canvasshow'
brush=[]
brush=hatch()
self.brush=brush
print('brush=',self.brush)
self.canvas2 = tk.Canvas(canvas, width=800, height=600, bg="light cyan")
canvas2=self.canvas2
self.canvas2.grid(row=0, columnspan=3)
print('self.nrow,self.ncol',self.nrow,self.ncol)
for i in range(self.nrow):
for j in range(self.ncol):
index=i*self.ncol+ j
filetpt="@D:\\xbmFile\\"+brush[index] + ".xbm"
print('i,j,index,filetpt=',i,j,index,filetpt)
xmin,ymin=self.dx+self.xgrid*j,self.dy+self.ygrid*i
xmax,ymax=self.dx+self.xgrid*(j+1),self.dy+self.ygrid*(i+1)
self.canvas2.create_polygon(xmin,ymin,xmax,ymin,xmax,ymax,xmin,ymax,width=2,outline='red',stipple=filetpt)
self.MDcount=0
self.canvas2.bind(sequence="<Button-1>", func=self.MouseDown2)
menubar = tk.Menu(window)
#-----------------------------
canvas2showmenu = tk.Menu(menubar, tearoff=0)
menubar.add_cascade(label='canvas2show', menu=canvas2showmenu)
canvas2showmenu.add_command(label='canvas2show', command=canvasPatternShow_)
def canvasPatternHide_():
self.canvas2.grid_forget()
#menubar = tk.Menu(window)
#-----------------------------
canvas2hidemenu = tk.Menu(menubar, tearoff=0)
menubar.add_cascade(label='canvas2hide', menu=canvas2hidemenu)
canvas2hidemenu.add_command(label='canvas2hide', command=canvasPatternHide_)
def MouseDown2(self,event,*kw):
x,y=event.x,event.y
if self.command=='canvasshow':
print('into mousedown canvas show')
indrow=int((y-self.dy)/self.xgrid)
indcol=int((x-self.dx)/self.ygrid)
index=indrow*self.ncol+indcol
xmin,ymin=300,300
xmax,ymax=428,420
try:
filetpt="@D:\\xbmFile\\"+self.brush[index] + ".xbm"
self.stipple=filetpt
self.canvas2.create_polygon(xmin,ymin,xmax,ymin,xmax,ymax,xmin,ymax,width=2,fill='white')
self.canvas2.create_polygon(xmin,ymin,xmax,ymin,xmax,ymax,xmin,ymax,fill='green',width=2,outline='red',stipple=filetpt)
self.canvas2.delete(self.id)
self.id=self.canvas2.create_text((xmin+xmax)/2,ymax+20,text=filetpt,font=20,fill='red')
self.lblremark.congig(text=filetpt)
except:
pass
self.pts=[]
self.MDcount=0
self.MDcount +=1
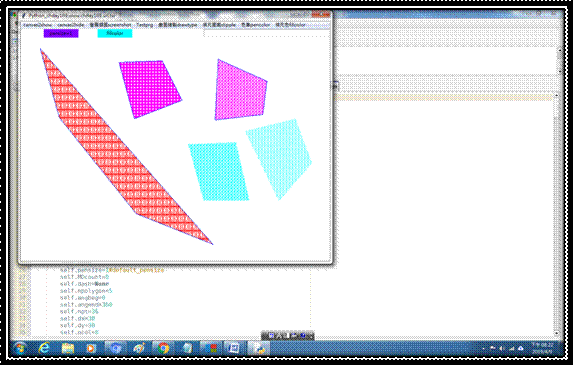
def MouseDown(self,event,*kw):
x,y=event.x,event.y
if self.command=='polygon':
print('in mouse down polygon,md,x,y',self.MDcount,x,y)
self.pts.append((x,y))
print('in mouse down polygon,pts',self.pts)
if self.MDcount==self.npolygon:
self.canvas.create_polygon(self.pts,fill=self.fillcolor,width=self.pensize,outline=self.pencolor,stipple=self.stipple)
self.MDcount +=1
def MouseDown2(self,event,*kw):
x,y=event.x,event.y
if self.command=='canvasshow':
print('into mousedown canvas show')
indrow=int((y-self.dy)/self.xgrid)
indcol=int((x-self.dx)/self.ygrid)
index=indrow*self.ncol+indcol
xmin,ymin=300,300
xmax,ymax=428,420
try:
filetpt="@D:\\xbmFile\\"+self.brush[index] + ".xbm"
self.stipple=filetpt
self.canvas2.create_polygon(xmin,ymin,xmax,ymin,xmax,ymax,xmin,ymax,width=2,fill='white')
self.canvas2.create_polygon(xmin,ymin,xmax,ymin,xmax,ymax,xmin,ymax,fill='green',width=2,outline='red',stipple=filetpt)
self.canvas2.delete(self.id)
self.id=self.canvas2.create_text((xmin+xmax)/2,ymax+20,text=filetpt,font=20,fill='red')
self.lblremark.congig(text=filetpt)
except:
pass
self.pts=[]
self.MDcount=0
self.MDcount +=1
(a)xbm圖檔影像:
我曾在我個人網站(www.chday169.url.tw)發表,如何在VB6中使用vb.NET預設填充圖案。現在我嘗試重寫那些能在Python中使用。
Python是一種廣泛而流行的計算機語言,許多人喜歡用它來繪製圖形,但它的自帶之填充stipple圖案並不多。在vb. Net使用者可有56種類型可供選擇。
Python canvas 只提供”err,gray25,gray50,gray75,hourglass,info,qutionhead,question,warning,qutionhead”
等圖案,但您可以設計和定義自己的點位圖。任何.xbm(X位圖)格式的文件都可以使用。這種格式的檔案以延伸檔案.XBM(xbm)命名,
前面則冠以檔案所在路徑及資料夾名稱,如“@D://xmbm//
dog.xbm”。 Python的xbm圖檔可以通過多種方式製作。簡單易行的方法是使用“Junior Icon Editor(www.sibcode.com)”或“xbmeditor.py”
(由Mike Cavender開發)等免費軟件繪製點圖並儲存為* .xbm文件。您也可以自己設計一個程序來繪製。
#define cross_width 8
#define cross_height 8
static unsigned char cross_bits [] = {
0x00,0xff,0x18,0x18,0x18,0x18,0xff,0x00};
創建完成xbm點圖可用X11bitmap編輯器開啟,或繪製圖像,然後將其轉換為位圖或xbm。如果要構建如下所示的xbm文件。
我們可以使用以“1”表示空白(白色),使用“0”表示實心(黑色)。由於第一行是空白的,這意味著第一行中的所有網格都填充空白,
即(1,1,1,1,1,1,1,1),因為255=(1 * 2 ^ 7 + 1 * 2 ^ 6 + 1 * 2 ^ 5 + 1 * 2 ^ 4 + 1 * 2 ^ 3 + 1 * 2 ^ 2 + 1 * 2 ^ 1 + 1 * 2 ^ 0)。
Pattern(0)=255 or Pattern(0)=&HFF or Pattern(0)=ox377
Pattern(1)=191 or Pattern(1)=&HBF or Pattern(1)=ox277
Pattern(2)=223 or Pattern(2)=&HFF or Pattern(2)=ox337
Pattern(3)=239 or Pattern(3)=&HBF or Pattern(3)=ox357
Pattern(4)=247 or Pattern(4)=&HFF or Pattern(4)=ox367
Pattern(5)=251 or Pattern(5)=&HBF or Pattern(5)=ox373
Pattern(6)=253 or Pattern(6)=&HFF or Pattern(6)=ox375
Pattern(7)=254 or Pattern(7)=&HBF or Pattern(7)=ox276
下圖是利用vb 6所繪製,第二個則由python程式畫的。


為操作方便,我們可以在一個專案中使用兩個canvas及MouseDown
事件(events),就如同vb一樣使用兩個表單(form)。一個繪圖,一個裝載自定點位圖檔。相關程式碼請參考page7~10。
請注意這裡,我的程序(vb.net)中使用的資料儲存數據格是逐列的,與其他坊間程式之逐行儲存不同,因此圖形編輯或顯示
(Junior Icon Editor,xbmEditor,XBMeditor0419(本人設計))應旋轉90度。To be continue(未完代續)